在Vultr上搭建SSR服务
用过很多第三方提供的梯子,因为是多人使用的,总是出现这样或那样的问题,使人非常困扰。还是自己动手搭建一个看看效果如何。
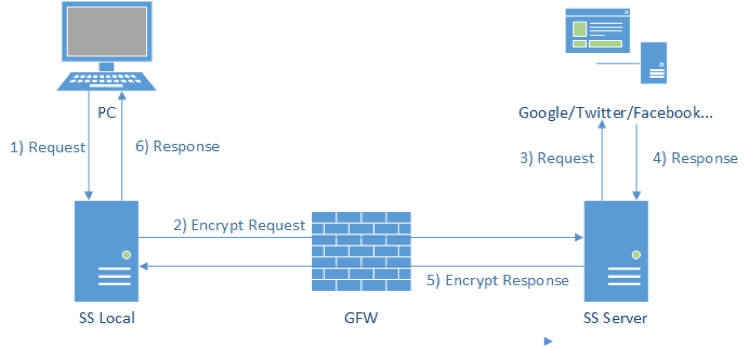
原理

购买
可以使用我提供的推荐链接注册,新用户激活后一个月内有付费行为就可以获赠 $20。
我习惯性选择CentOS,这个系统比较适合作为网络服务器,相较于其他系统CentOS可以提供更为高速的网络连接。如果是个人上网的话选择5刀一个月的版本就很足够了。
部署VPS
选好服务器之后,其他配置都可以直接使用默认。其中SSH Keys的作用是可以让你登陆的时候不用总是输密码。
等待系统自己部署完成之后你就可以查看自己的服务器信息了,还可以进行其他操作。
连接VPS
一般Ubuntu和Mac系统都可以直接使用ssh进入服务器的控制,Win10的话可以直接使用powershell使用ssh或者安装一个软件名字为Putty。
然后使用Vultr提供的root用户名和密码,登入自己服务器就可以了。但是在这种密码登陆的情况下总是会受到其他服务器的扫描并且会被尝试暴力登陆,所以建议服务器用密钥登陆,并且禁止使用密码登陆。
首先将我们需要用于远程连接VPS的公钥加入服务器的 .ssh/authorized_keys 文件中去,然后修改 /etc/ssh/sshd_config 文件
PasswordAutentication no
AuthorizedKeysFile .ssh/authorized_keys
之后再重启sshd服务
service sshd restart
部署SSR
安装
shadowsocks的部署分客户端和服务器端,我们通过ssh在远程服务器上部署服务端。方便起见使用teddysun提供的一键部署方案。
wget --no-check-certificate https://raw.githubusercontent.com/teddysun/shadowsocks_install/master/shadowsocks.sh
chmod +x shadowsocks.sh
./shadowsocks.sh 2>&1 | tee shadowsocks.log
最后一步输完,你应该会看到下图中内容──是要你为 Shadowsocks 服务设置一个个人密码。这个密码是使用这个代理服务器所用的密码,然后按照你个人设定一步步配置下来,通常默认的配置都没什么问题。
默认配置: 服务器端口:自己设定(如不设定,默认从 9000-19999 之间随机生成) 密码:自己设定(如不设定,默认为 teddysun.com) 加密方式:自己设定(如不设定,默认为 aes-256-cfb) 协议(Protocol):自己设定(如不设定,默认为 origin) 混淆(obfs):自己设定(如不设定,默认为 plain)
安装完成后你会看到以下格式的信息输出:
Congratulations, ShadowsocksR server install completed!
Your Server IP        :your_server_ip
Your Server Port      :your_server_port
Your Password         :your_password
Your Protocol         :your_protocol
Your obfs             :your_obfs
Your Encryption Method:your_encryption_method

Welcome to visit:https://shadowsocks.be/9.html
Enjoy it!
这就是你在本地客户端所要配置的内容了。
卸载方法
./shadowsocksR.sh uninstall
使用命令
启动:/etc/init.d/shadowsocks start 停止:/etc/init.d/shadowsocks stop 重启:/etc/init.d/shadowsocks restart 状态:/etc/init.d/shadowsocks status
配置文件路径:/etc/shadowsocks.json 日志文件路径:/var/log/shadowsocks.log 代码安装目录:/usr/local/shadowsocks
多用户配置示例
{
"server":"0.0.0.0",
"server_ipv6": "[::]",
"local_address":"127.0.0.1",
"local_port":1080,
"port_password":{
    "8989":"password1",
    "8990":"password2",
    "8991":"password3"
},
"timeout":300,
"method":"aes-256-cfb",
"protocol": "origin",
"protocol_param": "",
"obfs": "plain",
"obfs_param": "",
"redirect": "",
"dns_ipv6": false,
"fast_open": false,
"workers": 1
}
设置防火墙
Vultr控制台防火墙有时不好使,还是原生配置吧
firewall-cmd --zone=public --add-port=80/tcp --permanent # 开80端口
firewall-cmd --zone=public --add-port=1433/tcp --permanent # 开23333 TCP端口
firewall-cmd --zone=public --add-port=1433/udp --permanent # 开23333 UDP端口
firewall-cmd --reload  # 重载配置
iptables -L -n  # 查询防火墙规则
服务加速
首先是打开TCP Fast Open,编辑目录/etc/rc.local下的文件。并在该文件的末尾加上下面这行内容,保存。
echo 3 > /proc/sys/net/ipv4/tcp_fastopen
完成之后再去修改/etc/sysctl.conf文件,并在文末加上下面的内容,保存。
net.ipv4.tcp_fastopen = 3
然后再去修改对应的shadowsocks的对应配置文件/etc/shadowsocks.json。
把其中”fast_open”一项的false改成true。
部署锐速
完成上述步骤后,使用过程中可能会发现连接速度有时不太稳定。这就是「锐速」发挥功能的时候了。锐速 ServerSpeeder 是一个 TCP 加速软件,对 Shadowsocks 客户端和服务器端间的传输速度有显著提升。
而且,不同于 FinalSpeed 或 Kcptun 等需要客户端的工具,「锐速」的一大优势是只需要在服务器端单边部署就行了。换句话说,你不需要再安装另外一个应用。另外,「锐速」虽然已经停止注册和安装了,不过网上还是有不少「破解版」可用。
wget -N --no-check-certificate https://raw.githubusercontent.com/91yun/serverspeeder/master/serverspeeder-all.sh && bash serverspeeder-all.sh
安装需要一段时间,等待一会。如果出现下图内容,请按提示输入数字。另外,若运行中碰到提示说需要更换内核的话,请参考此文更换之。
安装完成之后,修改配置文件/serverspeeder/etc/config,将advinacc的0改成1,保存退出。
更多
更多配置文件可以参考: https://github.com/shadowsocksr-backup/shadowsocks-rss/wiki/Server-Setup https://github.com/shadowsocksr-backup/shadowsocks-rss/blob/master/ssr.md https://github.com/shadowsocksr-backup/shadowsocks-rss/wiki/config.json
Enjoy Reading This Article?
Here are some more articles you might like to read next: